
To wire lights on a 48-volt golf cart, follow these steps: connect the positive terminal of the light to the positive wire of the golf cart battery, connect the negative terminal of the light to the negative wire of the golf cart battery, and secure the connections with electrical tape or wire nuts. Finally, test the lights to ensure proper functionality.
Wiring lights on a 48-volt golf cart can enhance safety and visibility, particularly when driving in low-light conditions or after dusk. Whether you need to install headlights, taillights, or blinkers, properly wiring the lights is crucial for ensuring they work effectively.
By following a few straightforward steps, you can easily wire lights on your 48-volt golf cart. This guide will walk you through the process, providing clear instructions and tips for a successful installation. So, let’s get started and ensure your golf cart is properly equipped with lights to illuminate your path and keep you safe on the road.
Credit: golfmuni.com
Determining The Wiring Requirements
Before you can wire lights on your 48 volt golf cart, it’s important to determine the wiring requirements. This involves understanding the electrical system of your golf cart, identifying the necessary components for a lighting system, and calculating the power requirements for the lights.
Understanding The Electrical System Of A 48 Volt Golf Cart
When it comes to wiring lights on a 48 volt golf cart, it’s crucial to have a clear understanding of the electrical system. A 48 volt golf cart typically operates using six 8-volt batteries, connected in a series to produce the desired voltage. The positive terminal of one battery is linked to the negative terminal of the next battery, resulting in a total voltage of 48 volts.
Identifying The Necessary Components For A Lighting System
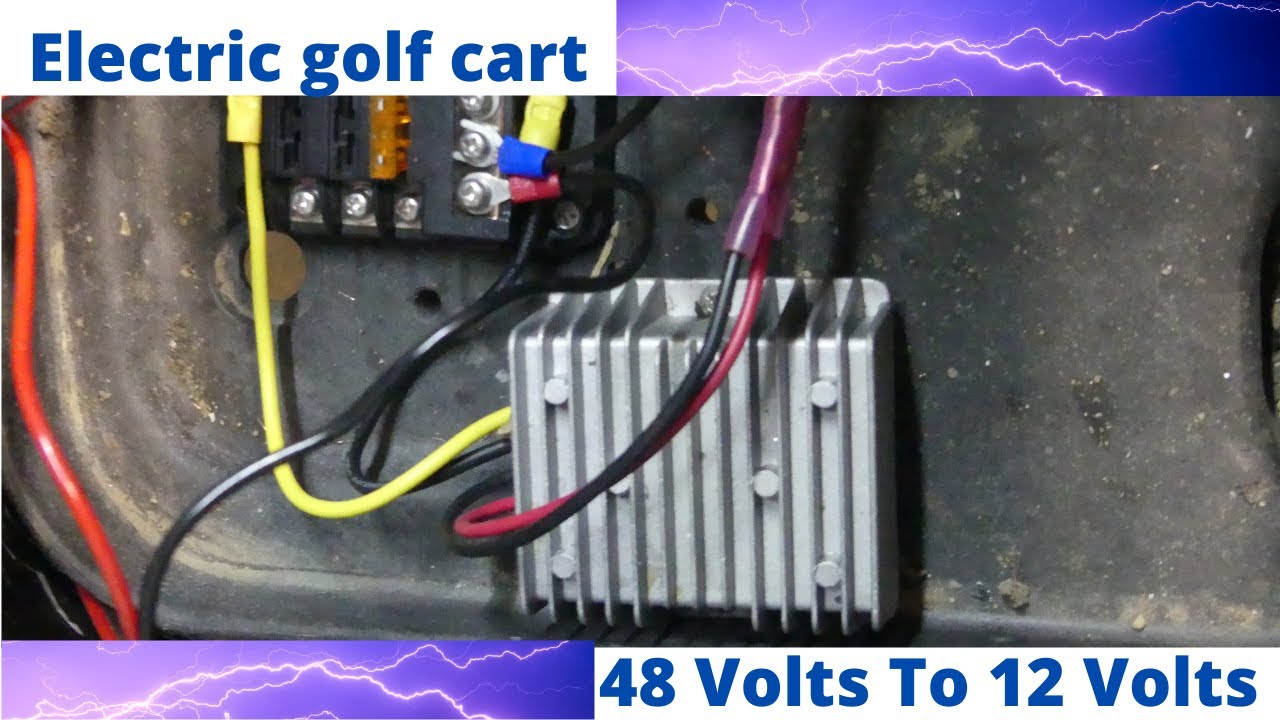
In order to wire lights on your golf cart, you’ll need to identify the necessary components for a lighting system. Firstly, you’ll require the lights themselves, which can include headlights, taillights, turn signals, and brake lights. Additionally, you’ll need a voltage reducer to convert the 48 volt electrical system to the lower voltage required for the lights. This voltage reducer helps ensure that the lights run efficiently without drawing excessive power from the batteries.
Calculating The Power Requirements For The Lights
Calculating the power requirements for the lights is essential in order to ensure that they operate effectively without draining the batteries excessively. To do this, you’ll need to consider factors such as the wattage of each light and the overall power available from the batteries. By calculating the power requirements, you can determine if you need to adjust the number or type of lights, or potentially add additional battery capacity to adequately power the lighting system.
In summary, determining the wiring requirements for lights on your 48 volt golf cart involves understanding the electrical system, identifying the necessary components, and calculating the power requirements. With this knowledge, you’ll be well-equipped to proceed with wiring the lights and enjoying improved visibility on your golf cart.
Gathering The Materials And Tools
To wire lights on a 48 volt golf cart, you’ll need materials and tools such as electrical wire, wire connectors, a voltage meter, wire cutters, and a screwdriver. Ensure that you gather these items before starting the installation process.
Choosing The Right Lighting Fixtures For A 48 Volt System
Selecting The Appropriate Wiring And Connectors
Gathering The Necessary Tools For The Installation Process
Gathering the necessary materials and tools is the first crucial step when wiring lights on a 48 volt golf cart. With the right components in hand, your installation process will be smooth and efficient. In this section, we will discuss the importance of choosing the right lighting fixtures, selecting the appropriate wiring and connectors, and gathering all the necessary tools for the task at hand.
Choosing The Right Lighting Fixtures For A 48 Volt System
When it comes to illuminating your 48 volt golf cart, choosing the right lighting fixtures is essential for optimal performance and safety. These fixtures should be designed specifically for a 48 volt system to ensure compatibility and durability. LED lights are highly recommended due to their energy efficiency and long lifespan. They provide bright and clear illumination while consuming minimal power, allowing you to enjoy extended battery life on your golf cart. Investing in quality LED lighting fixtures will brighten your ride and enhance your overall golfing experience.
Selecting The Appropriate Wiring And Connectors
Selecting the right wiring and connectors is equally important to ensure a reliable and efficient lighting system on your 48 volt golf cart. In order to handle the higher voltage of a 48 volt system, it is crucial to use wiring and connectors that are specifically designed for such applications. Opt for wires with a gauge suitable for 48 volt golf carts, ensuring sufficient current flow without any potential risks. Additionally, choosing high-quality connectors that are tightly secured will prevent loose connections and potential electrical hazards. Whether you are wiring headlights, taillights, or any other lighting accessories, selecting the appropriate wiring and connectors will play a significant role in a successful installation.
Gathering The Necessary Tools For The Installation Process
Before beginning the wiring process, gather all the necessary tools to ensure a seamless installation. The following table outlines the essential tools needed:
| Tools | Description |
|---|---|
| Wire strippers | A tool used to strip the insulation off the ends of wires. |
| Wire connectors | These connectors are used to secure the wiring connections. |
| Electrical tape | A type of tape used to insulate and protect the wiring connections. |
| Multimeter | A device used to measure voltage, current, and resistance. |
| Crimping tool | A tool used to crimp connectors onto wires securely. |
| Drill | A power tool used to create holes for mounting lights or routing wires. |
| Screwdriver | A tool used to secure screws or bolts during the installation process. |
| Wire nuts | These nuts are used to connect and secure wire connections. |
Having these tools readily available will enable you to complete the wiring process efficiently and with precision. Make sure to gather all the necessary tools before starting the installation, ensuring a hassle-free experience from start to finish.
Preparing The Golf Cart
Before you begin wiring lights on your 48-volt golf cart, it is essential to properly prepare the cart for installation. This guide will walk you through the necessary steps to ensure a safe and successful installation. Follow each step carefully to avoid any potential risks or damage.
Disconnecting The Battery To Ensure Safety
The first step in preparing the golf cart for light installation is to disconnect the battery. This step is crucial for your safety and prevents any accidental electrical discharge. Follow the steps below:
- Turn off the golf cart ignition and make sure it is parked in a safe, level spot.
- Locate the main battery disconnect switch and ensure it is in the “off” position.
- Use a wrench or the appropriate tool to disconnect the negative battery cable from the battery terminal.
By disconnecting the battery, you eliminate the risk of electric shock and ensure a safe working environment.
Locating The Ideal Placement For The Lights
Once the battery is disconnected, you can now focus on finding the ideal placement for your lights on the golf cart. Consider the following factors:
- Decide on the type of lights you want to install, such as headlights, brake lights, or signal lights.
- Inspect the front and rear areas of the golf cart to identify suitable locations for the lights.
- Ensure your chosen locations provide proper visibility and alignment for each light.
- Take into account any existing accessories or components on the golf cart that may interfere with the installation.
By carefully selecting the ideal placement for the lights, you can enhance both the aesthetics and functionality of your golf cart.
Cleaning The Area And Preparing It For Installation
Before you start installing the lights, it is essential to clean the chosen areas and prepare them for installation. Follow these steps:
- Thoroughly clean the surface of the golf cart where the lights will be attached using a mild cleaning solution and a clean cloth.
- Remove any dirt, debris, or existing adhesive that may hinder the proper attachment of the lights.
- If necessary, use a suitable adhesive to create a firm bond between the lights and the golf cart surface.
By cleaning and preparing the installation area, you promote better adhesion and ensure a firm, long-lasting attachment of the lights.
Wiring The Lights
Properly wiring the lights on your 48-volt golf cart is essential for safety and convenience while driving at night. By installing the light fixtures securely, connecting the wiring to the battery and switches, and testing the lights for proper functionality, you can ensure a smooth and trouble-free lighting system for your golf cart. Follow the step-by-step guide below to wire your lights effectively and efficiently.
Installing The Light Fixtures Securely
Start by carefully selecting the light fixtures for your golf cart. Look for fixtures that are specifically designed for 48-volt systems. Once you have the appropriate fixtures, follow these steps to install them securely:
- Locate the desired spots on your golf cart to mount the light fixtures. Choose places that provide optimal visibility without obstructing the driver’s view.
- Using a drill, create holes in the mounting locations for the fixtures.
- Securely attach the light fixtures to the golf cart using the appropriate screws or brackets.
- Ensure that the fixtures are firmly in place and do not wobble or move while driving.
Connecting The Wiring To The Battery And Switches
Once the fixtures are securely installed, it’s time to connect the wiring to the battery and switches. Follow these steps to ensure a proper connection:
- Identify the positive and negative terminals on your 48-volt golf cart battery.
- Connect the positive wire from each light fixture to the positive terminal of the battery. Make sure the connections are tight and secure.
- Connect the negative wire from each light fixture to the negative terminal of the battery.
- Next, locate the switches you will use to control the lights. Attach the positive wire from each fixture to the appropriate switch, following the manufacturer’s instructions.
- Connect the negative wire from each fixture to a common ground point on the golf cart.
Testing The Lights To Ensure Proper Functionality
After wiring the lights, it’s crucial to test them to ensure they are functioning correctly. Follow these steps to test the lights:
- Turn on your golf cart’s power.
- Activate the light switches to test each light fixture individually.
- Check if all lights are turning on as intended.
- Inspect the wiring connections and fixtures for any signs of overheating, loose connections, or other issues.
- If any issues are detected, double-check the wiring connections and consult a professional if necessary.
Remember, a properly wired lighting system not only enhances your visibility while driving at night but also ensures the safety of everyone on the golf course. By following these steps and ensuring the lights are securely installed, correctly wired, and effectively tested, you can enjoy a well-lit golf cart ride even after the sun goes down!
Troubleshooting And Maintenance
A well-functioning lighting system is crucial for a safe and enjoyable golf cart experience. However, just like any other electrical component, issues can arise from time to time. Additionally, routine maintenance is essential to ensure that the lights are always performing at their best. In this section, we will discuss some common issues that you may encounter with the lighting system of your 48 Volt golf cart and the steps to troubleshoot them effectively. We will also explore the importance of regular maintenance and how to keep the wiring secure and protected from damage.
Troubleshooting Common Issues With The Lighting System
If you notice any problems with the lights on your 48 Volt golf cart, such as flickering, dimming, or complete failure, there are a few troubleshooting steps you can take. By identifying and addressing the root cause of the issue, you can restore your lighting system to its optimal performance. Here are some common problems and their possible solutions:
- Frequent bulb burnouts: If you find yourself replacing light bulbs too often, it could be an indication of a deeper issue. Start by checking the wiring connections to ensure they are secure. Loose connections can cause excessive heat and lead to bulb burnouts. Also, make sure you are using bulbs with the correct voltage rating.
- Inconsistent light output: If the brightness of the lights seems to vary or fluctuate, it could be due to a faulty voltage regulator. Use a multimeter to test the voltage output from the regulator. If the readings are inconsistent, consider replacing the regulator.
- Intermittent lighting: If the lights turn on and off unexpectedly, check the wiring harness for any loose or damaged wires. Over time, vibrations from driving can cause connections to become loose. Secure any loose wires and repair or replace damaged ones.
Performing Regular Maintenance To Keep The Lights At Optimal Performance
Regular maintenance is key to ensuring the longevity and optimal performance of your golf cart’s lighting system. By following these maintenance practices, you can minimize issues and keep the lights shining brightly:
- Clean the light fixtures: Dirt and debris can accumulate on the surface of the light fixtures, reducing their brightness. Regularly clean the fixtures with a non-abrasive cleaner and a soft cloth to remove any buildup.
- Inspect the wiring: Routinely inspect the wiring harness for any signs of wear and damage. Look for frayed or exposed wires, loose connections, or any other abnormalities. Address any issues promptly to prevent further damage.
- Check the battery: A weak or failing battery can affect the performance of the lighting system. Regularly test the battery voltage and clean the terminals to ensure proper connection. Replace the battery if necessary.
Ensuring The Wiring Is Secure And Protected From Damage
The wiring is the lifeline of your golf cart’s lighting system, and it needs to be secure and protected from any potential damage. Here are some steps to ensure the wiring is in optimal condition:
- Secure the wiring connections: Check all wiring connections to ensure they are tightly secured. Loose connections can lead to voltage drops and cause performance issues.
- Protect the wiring: Route the wiring away from areas where it can get pinched, crushed, or exposed to excessive heat. Use wire looms or conduit to protect the wires from potential damage.
- Keep it clean and dry: Moisture and dirt can corrode the wiring and cause malfunctions. Regularly clean the wiring and keep it dry to prevent any damage.
By regularly troubleshooting and maintaining your 48 Volt golf cart’s lighting system, you can ensure its optimal performance and longevity. By implementing these practices, you can enjoy a safe and well-lit ride every time you step onto the golf course.
Frequently Asked Questions On How To Wire Lights On A 48 Volt Golf Cart
How Do You Wire Lights To A Golf Cart?
To wire lights to a golf cart, follow these steps: 1. Identify the power source and locate the switch for the lights. 2. Connect the positive wire from the lights to the positive terminal of the power source. 3. Connect the negative wire from the lights to the negative terminal of the power source.
4. Test the lights to ensure they are working properly. 5. Securely fasten all wiring to prevent any damage or interference.
What Voltage Are Golf Cart Headlights?
Golf cart headlights typically run on a 12-volt system.
How Do You Wire Accessories To A Golf Cart?
To wire accessories to a golf cart, follow these steps: 1. Determine the power source for the accessories. 2. Disconnect the cart’s battery. 3. Choose a suitable wiring route. 4. Connect the accessories to the power source using appropriate connectors.
5. Reconnect the battery and test the accessories.
What Size Wire For Golf Cart Lights?
For golf cart lights, the recommended wire size depends on the wattage and length of the wire. Generally, a 14-gauge wire should work well for most golf carts. It’s always a good idea to consult the manufacturer’s guidelines or seek professional advice to ensure proper wiring and safety.
How Do You Wire Lights On A 48 Volt Golf Cart?
To wire lights on a 48 volt golf cart, first, determine the type of lighting setup you want. Then, connect the positive and negative terminals of the lights to the corresponding terminals on the golf cart battery. Use appropriate wiring, connectors, and switches for a safe and reliable setup.
What Are The Benefits Of Wiring Lights On A 48 Volt Golf Cart?
Wiring lights on a 48 volt golf cart provides increased visibility and safety, especially when driving at night or in low-light conditions. It allows you to illuminate the surroundings, making it easier to navigate and spot potential hazards on the golf course or any other terrain.
Where Can I Purchase The Necessary Wiring Materials For My 48 Volt Golf Cart Lights?
You can find the necessary wiring materials for your 48 volt golf cart lights at local automotive stores, electronics shops, or online retailers. Make sure to choose high-quality wires, connectors, and switches suitable for your golf cart’s voltage requirement to ensure a reliable and long-lasting lighting setup.
Conclusion
To successfully wire lights on a 48-volt golf cart, it’s crucial to understand the process and follow the necessary steps. By ensuring the correct wiring connections, using the appropriate tools, and adhering to safety precautions, you can enhance your golf cart’s visibility and functionality.
Remember to consult your golf cart’s manual and seek professional help if needed. With these simple guidelines, you’ll be able to enjoy your golf cart safely even in low-light conditions. So, get ready to illuminate your rides and make the most out of your golfing adventures!